TGF Inventory System is a complete itemization and inventory solution for Unreal Engine. It allows you to create items that can be picked up from the world and stored in a player inventory, chests, or other containers, put the items back in the map and much more.
1. Basic integration
Verified users on Discord can request a sample project that already includes everything fully set up, allowing you to start building your game immediately.
If you prefer to integrate TGF Inventory into an existing project, continue reading and follow the step by step guide.
The following steps guide you through integrating the plugin into an existing project.
It is assumed that the user has at least a basic understanding of the Unreal Engine API and working with Blueprints.
Paths and file names are optional and can be changed, but for simplicity the documentation will always refer to the suggested ones. If you have any issues during the process, you can request help through the Discord channel.
a. Initial setup
After you install the plugin in the /plugin folder of your project, in your editor, go to Edit > Plugins. Search for TGF_Inventory, enable it and restart it.
Note: If you are integrating TGF_Crafting look for this plugin instead, TGF_Inventory will be included as module.
In the Content Browser, go to Plugins > TGF_Inventory Content (or TGF_Crafting Content). Select the Data, UI and Models directories, drag them into the root of your project under Content, and choose Copy when prompted.
Create the following subdirectories inside Content
/Blueprints
/Items
/Items/Rarities
/Actors/Pickups
/Actors/Placeables
b. Character setup
Open your character blueprint and add the following components
TGFInventory
TGFInteraction
TGFPlacement
You may want to play around with the Interact Distance value in the TGFPlacement component, 1500.f is a good start but it depends on your setup.
Add a variable of type TGFInventoryComponent (object) named CurrentContainer, tick Expose on Spawn and Instance Editable.
Save and compile.
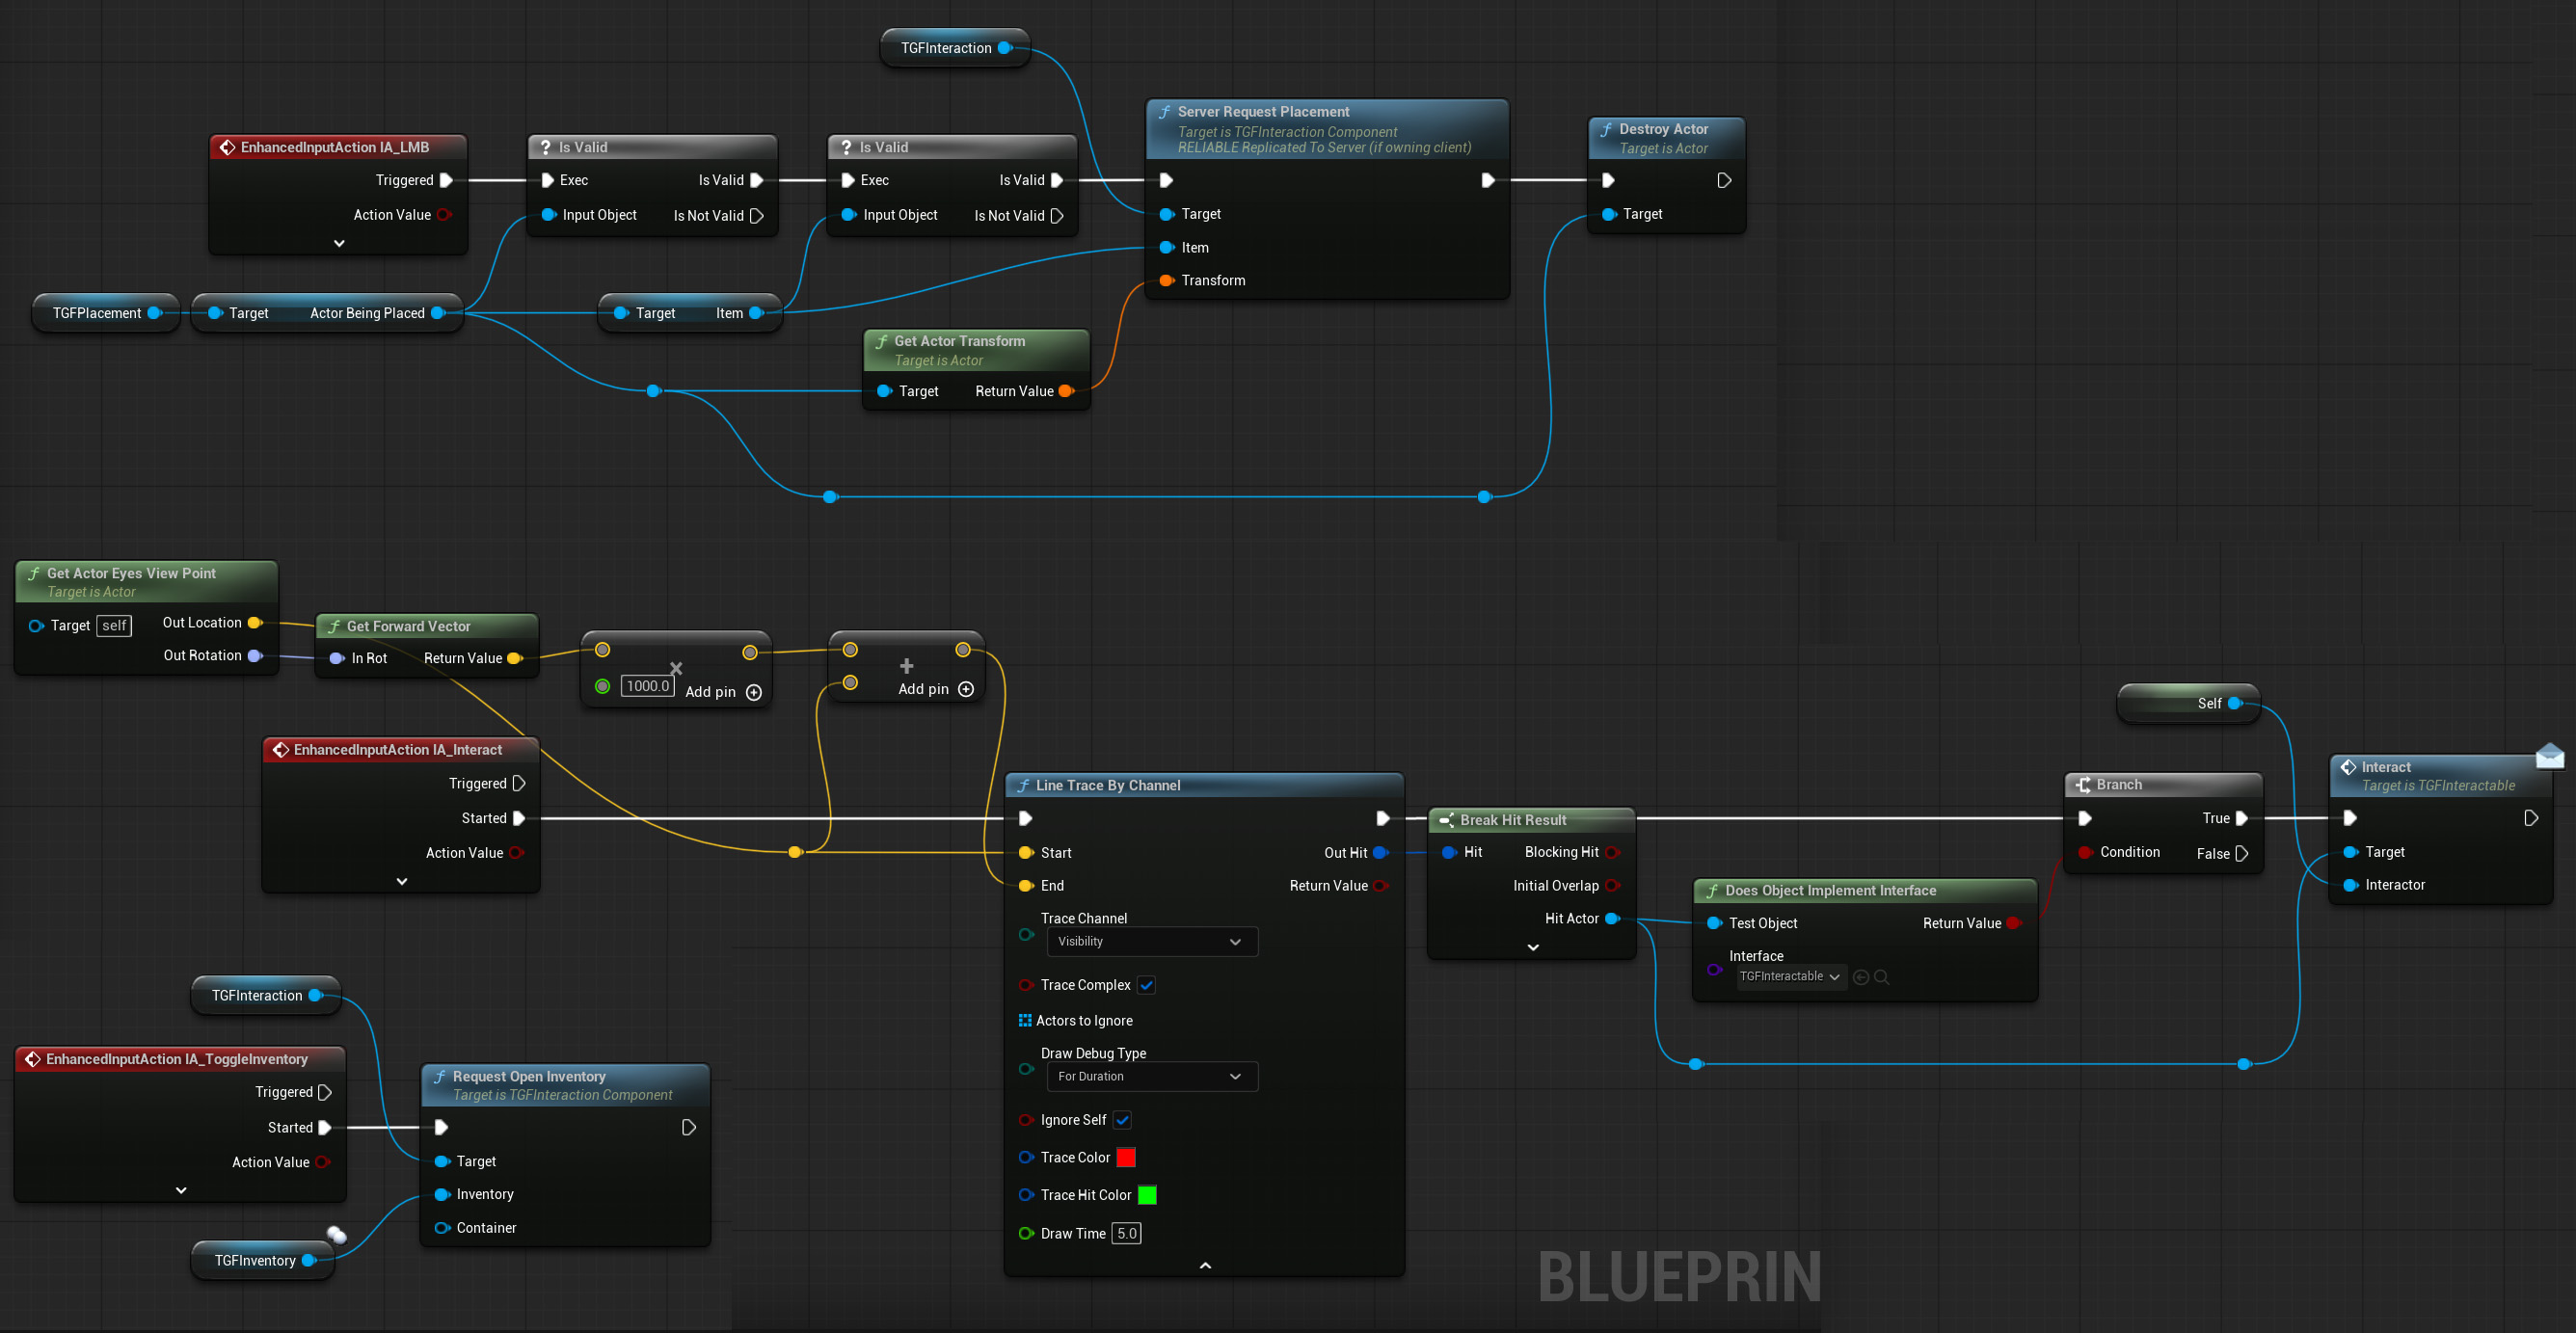
c. Input configuration
In the folder where you store your input assets, create the following input actions
IA_ToggleInventory
IA_Interact
IA_LMB
Open your Input Mapping Context, typically IMC_Default in template projects, and add three new mappings using the input actions created above. Assign keys as preferred. Suggested bindings are I for ToggleInventory, E for Interact, and Left Mouse Button for IA_LMB.
Open your character blueprint and implement the corresponding input logic to handle inventory toggling, interaction, and primary click. You just need to replicate this:
d. Create required blueprints
Create the following blueprints
BP_InventoryHUD with parent class TGFInventoryHUD in /Blueprints
BP_PickupBase with parent class TGFPickup in /Actors/Pickups
Open BP_InventoryHUD and assign the widget classes
Inventory Widget Class set to WBP_Inventory
External Inventory Widget Class set to WBP_ExternalInventory
Item Info Widget Class set to WBP_ItemInfo
You will notice duplicate entries for each widget. This happens because the widgets exist both in the plugin and in your project after copying the content. Always select the ones located under Content/UI. If you select the plugin versions, your changes will be overwritten when the plugin updates.
Access Manager Form Widget Class can be skipped for now. It is only required for advanced features.
e. Gameplay Tags / Categories
Go to Edit > Project Settings > Gameplay Tags > Manage Gameplay Tags.
Click the add button and create as many Item Categories as needed. In the Source field, always select DefaultGameplayTags.ini.
You can group tags using a prefix and a dot, for example Inventory.Weapons or Inventory.Consumables. This helps organization.
Make sure to create a category named Inventory.Unfiltered or Inventory.All. This is required for the item filtering system in the UI.
Finally open /Data/DA_Categories and edit accordingly
f. Game mode configuration
Go to Edit > Project Settings > Maps and Modes, locate the in-use GameMode, open it, and set the HUD Class to BP_InventoryHUD. Save and compile.
g. Creating an item and its pickup
Pickups are item instances that the player can collect from the world. The plugin already includes all required logic for this.
Go to /Items, create a new blueprint with parent class TGFItem, and name it BP_ItemPistol. Open it and assign values to Name, Icon, and Category. Additional properties can be configured later.
Note: A set of 128 icons is included and can be used if desired.
Right click on /Actors/Pickups/BP_PickupBase and create a child blueprint named BP_PickupPistol. Open it, assign a static mesh to the MeshComponent, then locate the Item Class property and assign BP_ItemPistol.
Go back to BP_ItemPistol and assign BP_PickupPistol as pickup class.
Finally, drag BP_PickupPistol into the level to place it in the world.
Congratulations, you are ready to go!
Now you should be able to pick items from the ground by pressing E and to open the inventory by pressing I.
All the following steps are optional, feel free to continue reading if you want to implement some advanced features.
2. Item rarity (optional)
The system supports item rarity levels. It is not tied to a predefined structure, so you can create as many levels as needed, define names, colors, and relative values.
Inside /Items/Rarities right click, then Miscellaneous > Data Asset, choose TGFItemRarity as the parent class, and name it DA_RarityCommon.
Duplicate it to create additional rarity levels.
Open each data asset and configure its name and color.
Open the widget located at /UI/Widgets/WBP_InventorySlot. In Class Defaults, find DefaultRarityAsset and assign DA_RarityCommon or any asset you want to use as the base rarity.
Open BP_ItemPistol and assign any rarity other than common.
That's it, now the default widget will show a badge with the color of the item rarity (It does not display anything for base rarity items)
3. Weight system (optional)
The inventory supports weight limits. When enabled, the inventory will not accept new items if the total weight exceeds the limit, even if there are free slots.
This feature is enabled by default. To disable it, open the inventory component and disable CheckWeight. You can also modify the limit using MaxSupportedWeight.
This setting is per inventory, allowing flexibility. For example, you may want weight enabled for the player inventory but disabled for chests.
Each item must have a weight value. The default is zero.
4. Durability (optional)
When creating items, you can define whether the item uses durability, its maximum durability, and whether it breaks and is removed when durability reaches zero.
The TGFInventory component also includes methods to consume and repair durability. You only need to call them from your own logic.
    /**
     * Reduce durability of a specific slot item.
     *
     * @param Amount Durability to reduce.
     * @return True if the item reached zero durability.
     */
    UFUNCTION(BlueprintCallable, BlueprintAuthorityOnly, Category = "Inventory|Durability")
    bool ConsumeDurability(int32 SlotIndex, float Amount);

    /** Repair an ítem to max durability */
    UFUNCTION(BlueprintCallable, BlueprintAuthorityOnly, Category = "Inventory|Durability")
    void RepairItem(int32 SlotIndex);
5. Chests (optional)
The plugin includes full support for external inventories such as chests, allowing items to be transferred between them and the player.
a. Creating a chest
In /Actors/Placeables, create a blueprint with parent class TGFPlaceableActor named BP_PlaceableChest. Add a Static Mesh Component and assign a mesh. Then add a TGFInventory component.
Create the item that represents the chest by repeating the same process used for the pistol (1.g).
Name the item BP_ItemChest and the pickup BP_PickupChest.
Since this is an item meant to be placed in the world tick IsPlaceable in BP_ItemChest.
Set BP_PlaceableChest as the placeable class.
In the Event Graph of BP_PlaceableChest, add the required interaction logic for opening the chest inventory.
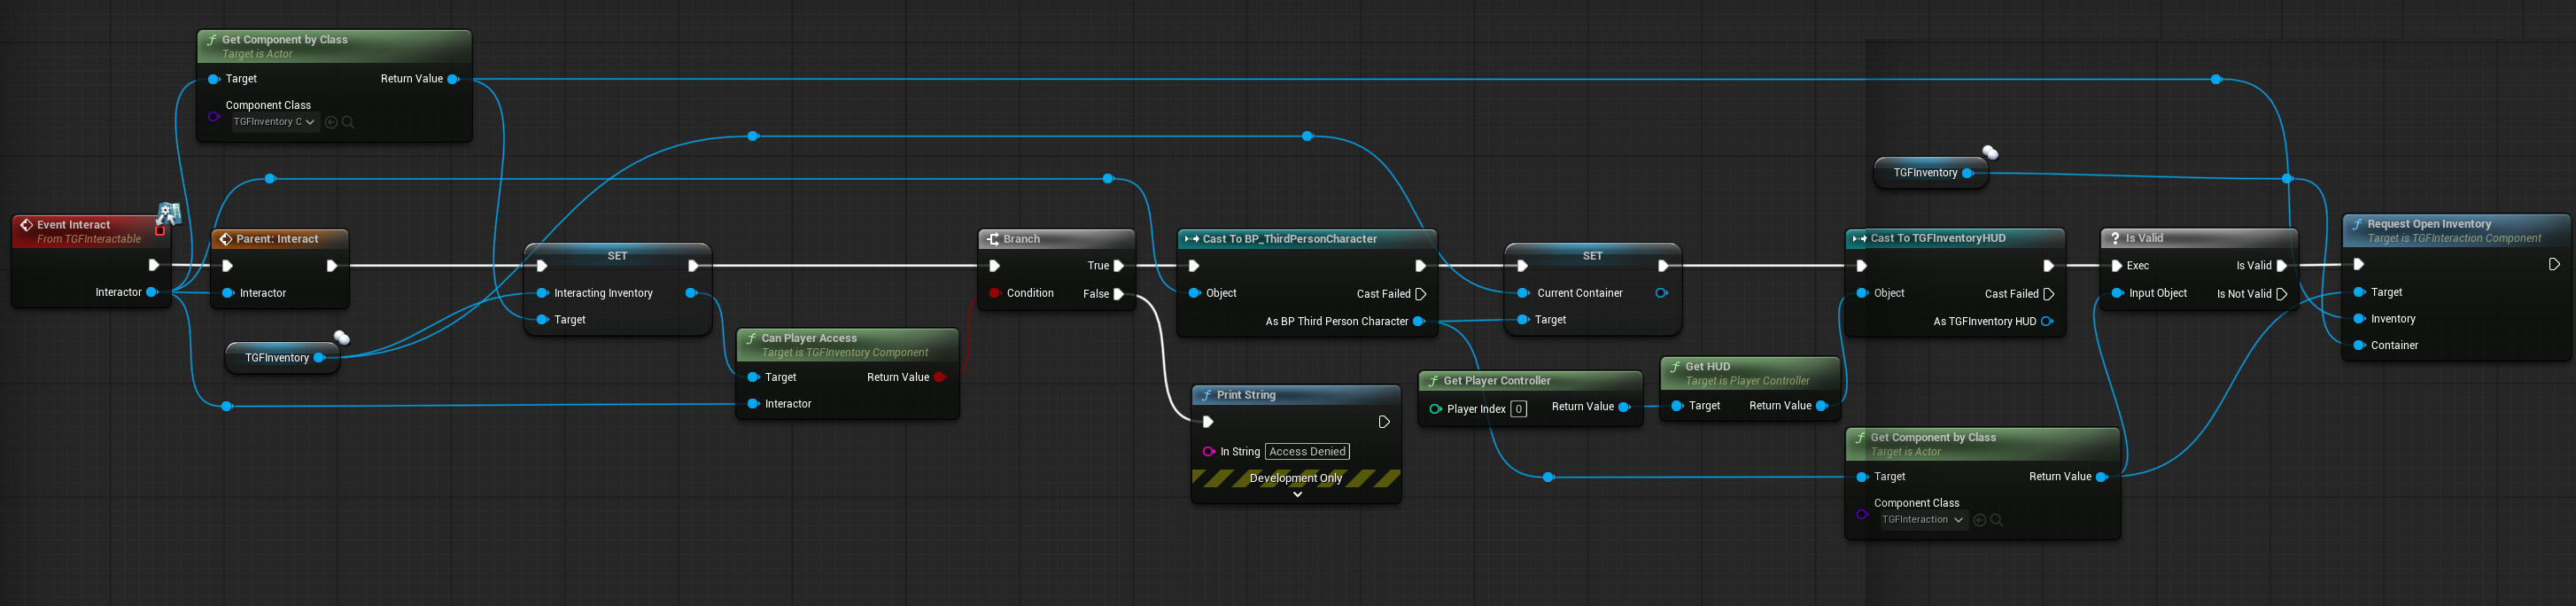
Cast to your own character class, and the parent interact node is obtained by right clicking the Event Interact node.
Finally, place an instance of BP_PickupChest in the level.
Now you can collect the chest item from the ground and from the inventory click Place, hit LMB once you decide the spot when you want to place it and now it's ready to interact with players.
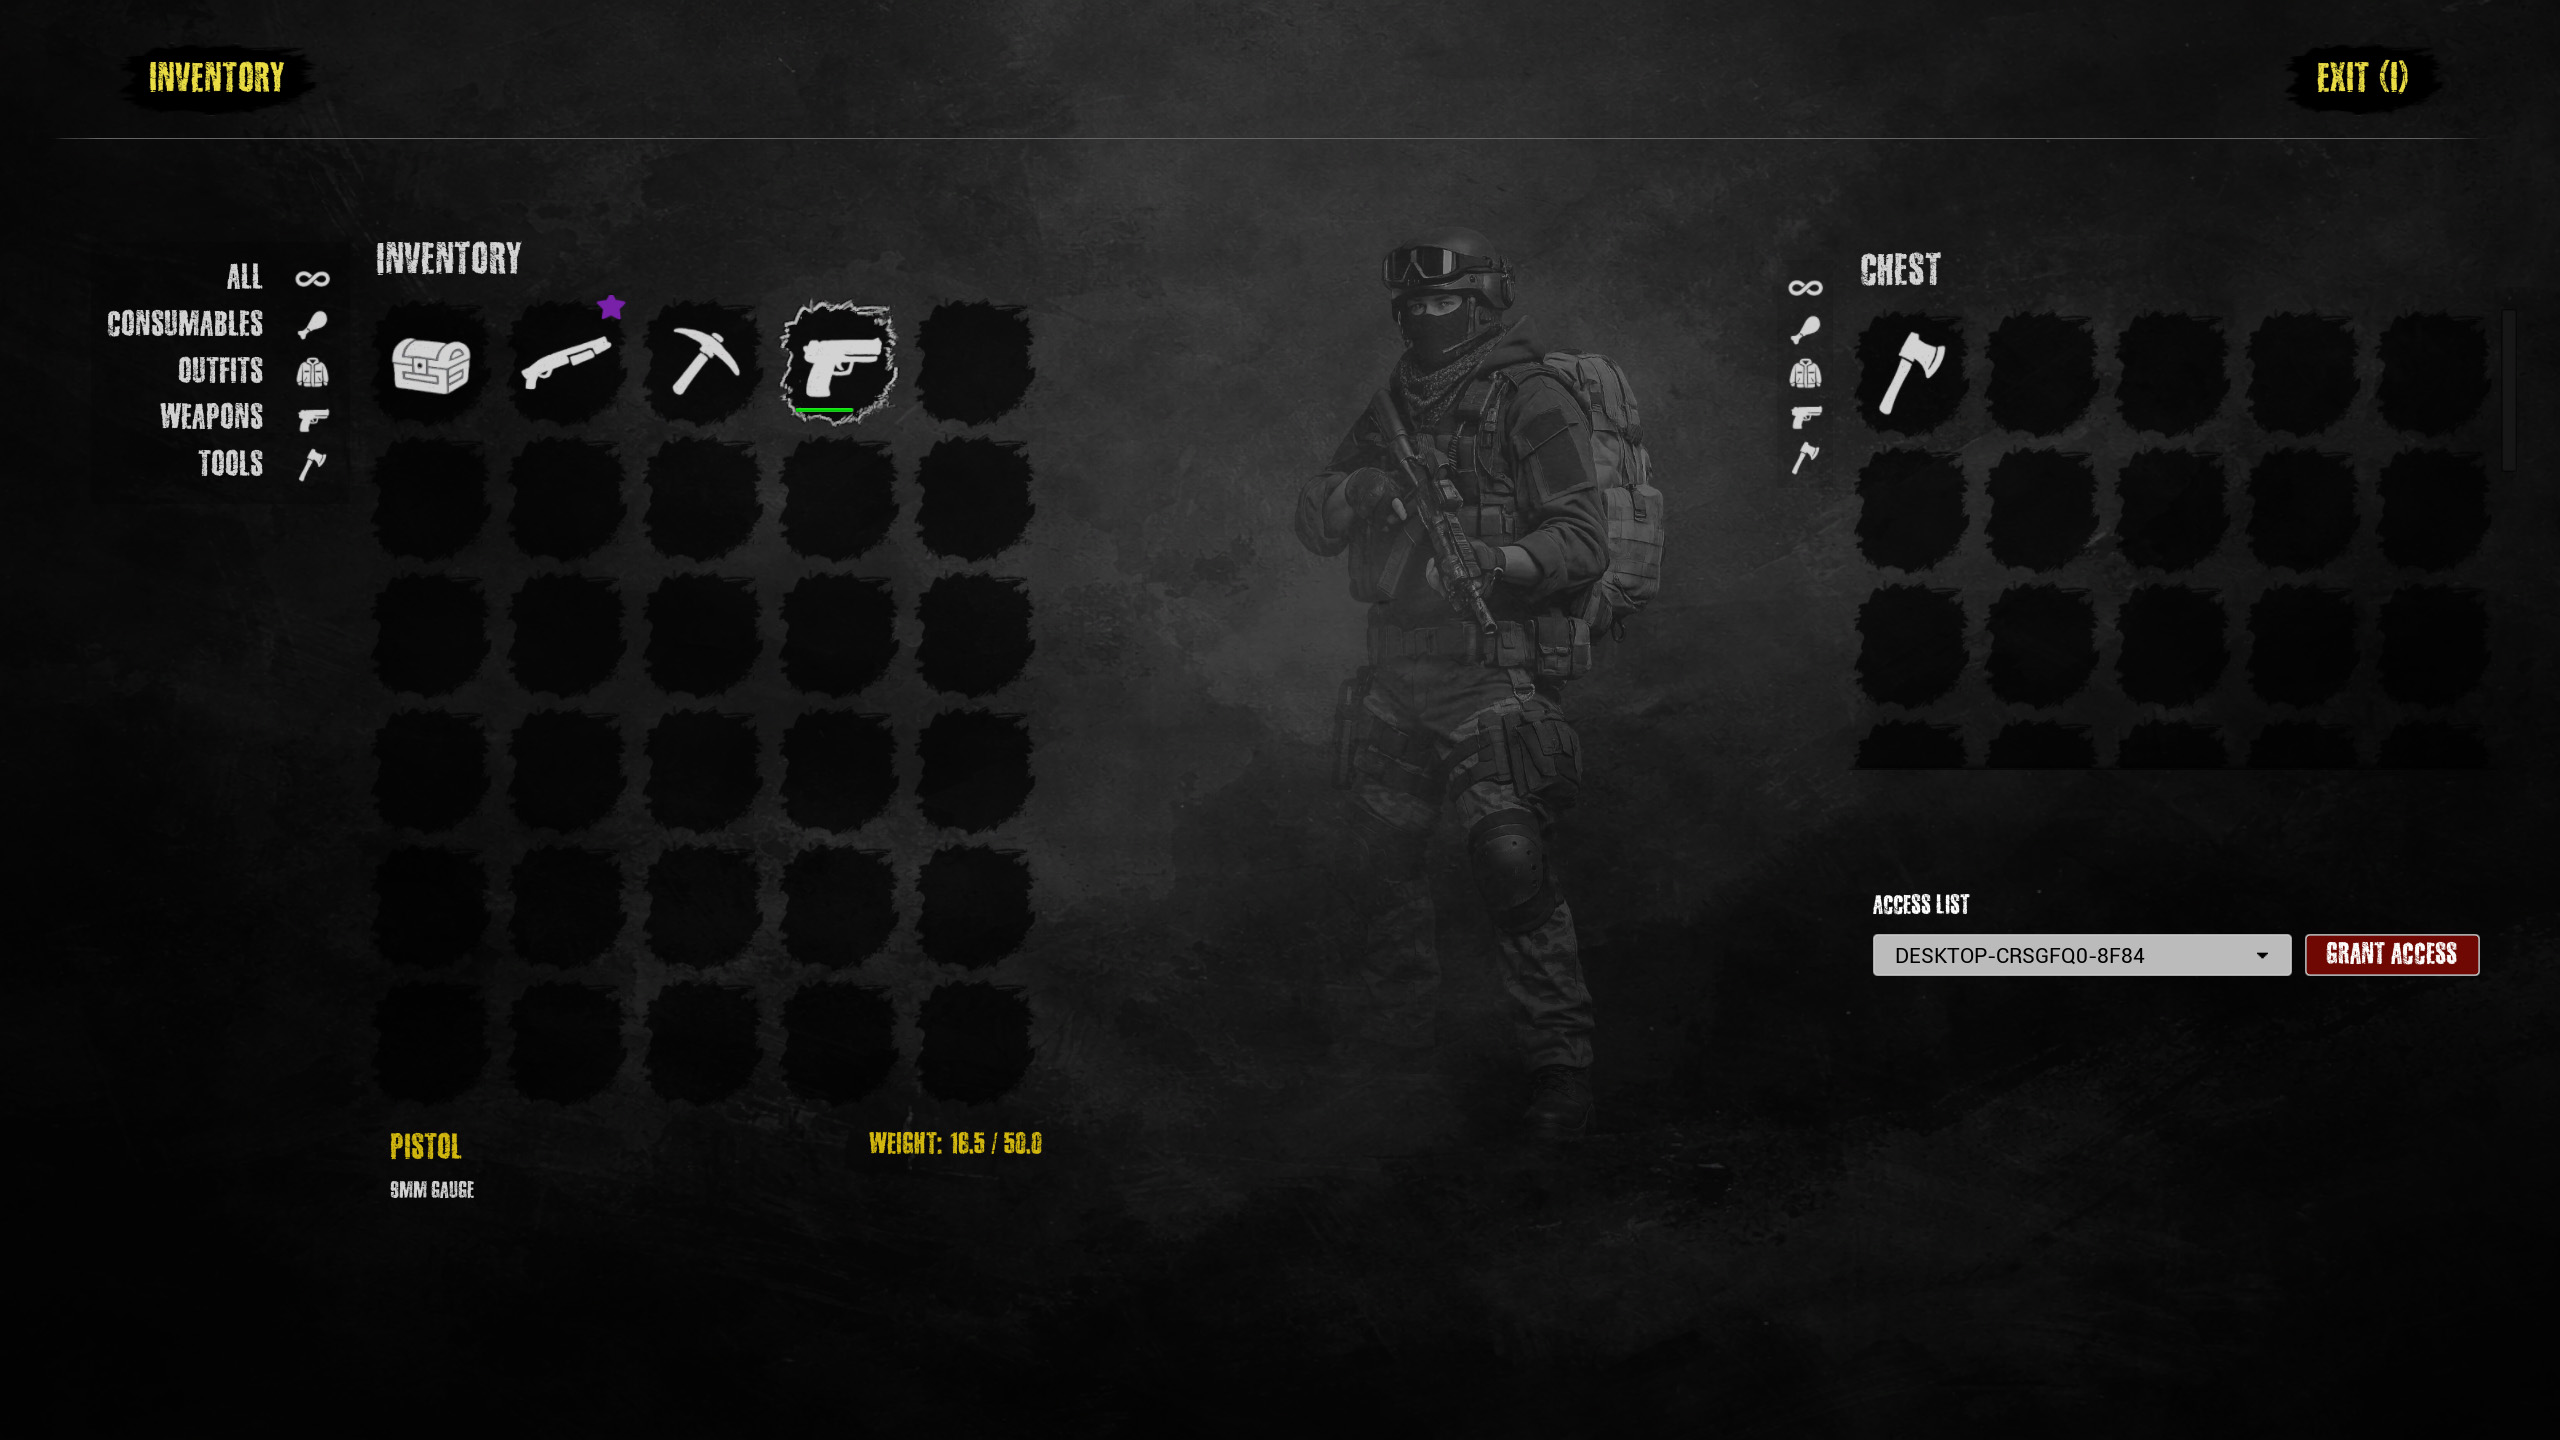
6. Permissions (optional) (experimental)
Note: The permissions system is an experimental feature. It still has limitations and may contain errors.
When a player places an object of type TGFPlaceableActor in the world, it becomes owned by that player, including any inventory components it may contain.
This type of actor is not limited to chests. You can create anything from simple decorative objects to fully interactive actors. To enable interaction, implement the Interact method from the TGFInteractable interface and add your logic there.
Regarding inventories and chests, as mentioned earlier, they become owned by the player who places them. By default, they have public access, which means any other player in the session can access them as long as they are close enough to the chest. As an anti cheat measure, access is denied if the player is not within range of the actor that contains the inventory.
If you want to restrict this behavior, you can change the security level using the AccessLevel property on the component.
UENUM(BlueprintType)
enum class EInventoryAccessLevel : uint8
{
    Public      UMETA(DisplayName = "Public", ToolTip = "Anyone can open it and move items"),
    Private     UMETA(DisplayName = "Private", ToolTip = "Only the Owner can access"),
    Restricted  UMETA(DisplayName = "Restricted", ToolTip = "Only Owner and users in the AccessList"),
    Locked      UMETA(DisplayName = "Locked", ToolTip = "No one can open it (e.g., event-locked)")
};
From the access list, the owner can grant or revoke access to other players. However, as mentioned earlier, this feature is still experimental, so use it at your own discretion.
7. Customization (optional)
TGF Inventory includes multiple customization options. All required logic and supporting artwork are already included, allowing you to adapt the system to your project needs.
Check the properties of the included widgets. You can modify colors, textures, and how they respond to different events.